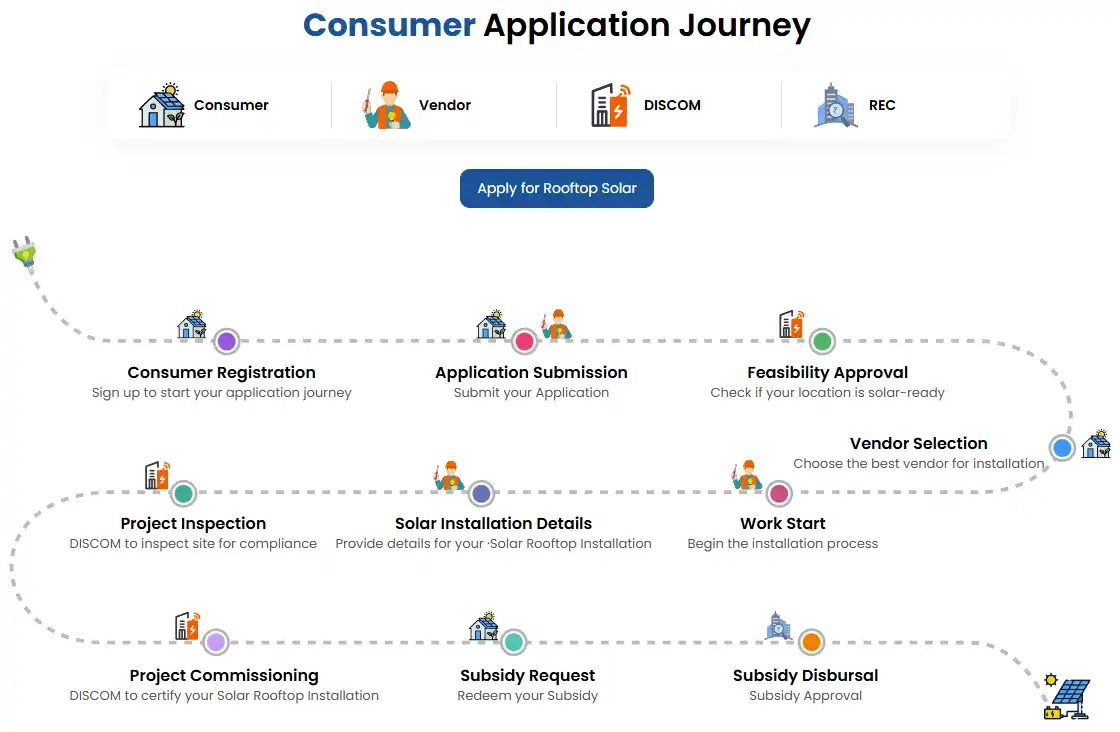
The 100% Digital Registration Process
Applying for the PM Surya Ghar Muft Bijli Yojana has been entirely digitized to ensure transparency and eliminate corruption.
The entire process is conducted via the official
National Portal
for Rooftop Solar (pmsuryaghar.gov.in). Below is our
detailed, step-by-step guide on how to complete your registration
without making mistakes.
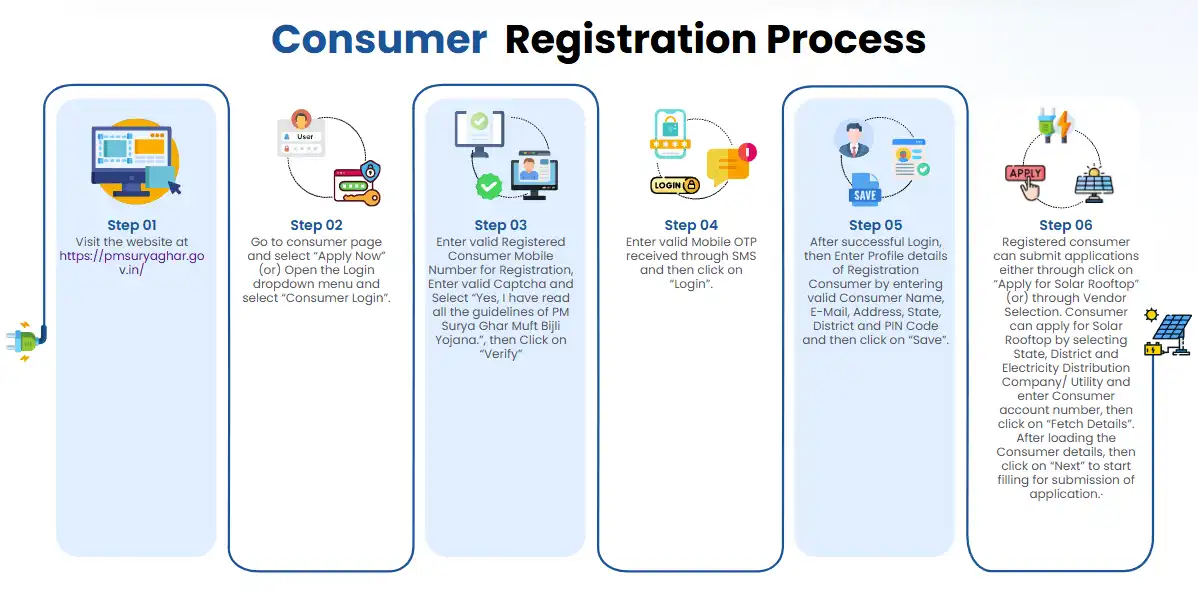
Step 1: Initial Portal Registration
- Visit the official website or download the PM Surya Ghar app.
- Click on the "Register Here" or "Apply for Rooftop Solar" button.
- Select your State and your local Electricity Distribution Company (DISCOM).
- Enter your Electricity Consumer Number (found on your bill), Mobile Number, and Email ID.
- Verify your mobile number using an OTP to complete the primary registration.
Step 2: Submit the Technical Application
- Log in to the portal using your Consumer Number and Mobile Number.
- Fill out the comprehensive rooftop solar application form. Provide details such as your exact address and required solar plant capacity (e.g., 2kW, 3kW).
- Upload a scanned copy of your latest electricity bill and a cancelled cheque (for future subsidy transfer).
- Submit the application. Your local DISCOM will now review it and conduct a technical feasibility check.
Step 3: Approval and Installation
Wait for the feasibility approval from your DISCOM. You will be notified via SMS and email.
Once approved, you must choose a registered and empaneled vendor from the portal's approved vendor list for your state. The vendor will install the solar panels according to the stringent MNRE safety guidelines.
Step 4: Net Metering and Inspection
After the physical installation is complete, submit the installation details on the portal to apply for a net meter installation.
DISCOM officials will visit your premises to inspect the system and officially install the bi-directional net meter. Upon successful inspection, a commissioning certificate is generated.
Step 5: Subsidy Claim
After receiving the commissioning report, log in to the portal one last time. Ensure your bank details are correct and hit submit to claim your subsidy.
The subsidy amount will be transferred directly to your bank account via DBT within 30 days.
Important Documents Required
Keep these documents ready digitally before you start your application:
- ✓ Latest Electricity Bill (Not older than 3 months)
- ✓ Aadhaar Card (for identity verification)
- ✓ Bank Passbook or Cancelled Cheque (for the DBT subsidy transfer)
- ✓ Photograph of the applicant
- ✓ Proof of Ownership (Property Tax receipt, if required by your state)
Note: While the national portal handles primary PM Surya Ghar registrations, states like Uttar Pradesh integrate with the national database to provide additional state-level top-up subsidies.